Windows File Explorer is a powerful tool that can be used for many different tasks to help us work efficiently. In this blog post, we will take the most popular Windows 10 operating system as an example and discuss 6 tips and tricks that will help you use Windows File Explorer like a pro!

Windows 10 offers users the ability to compress and uncompress files using zip archives straight from Windows File Explorer. To zip a collection of files, first click and then right-click the items. From the menu, select Send to Compressed (zipped) Folder and then zipped folder. After that, rename the zipped file if desired. Besides, you may decompress zip files by right-clicking on them and selecting Extract All from the drop-down menu. Confirm the destination before proceeding by clicking Extract.
On Windows 10, you may view a gallery of all the images in a folder as a slideshow. Select a photo and then pick Slide Show from the Picture Tools tab. Simply sit back and enjoy the show now. Each picture lasts around five seconds, but you can press an image to advance to the next one by right-clicking on it. To alter the speed, go ahead or backward, pause the show, or quit it, and right-click on any image in the slide show; a pop-up menu will appear with options to change these settings.
Windows offers a Libraries option that lets you store frequently accessed folders, but it does not show them by default. If you want to use libraries and have them readily accessible, you must turn on File Explorer's Library feature. To accomplish this in Windows 10 File Explorer, go to the View tab and then select the Navigation Pane option. Select Show libraries from the pop-up menu. In File Explorer, your libraries will appear at the bottom of the left pane.
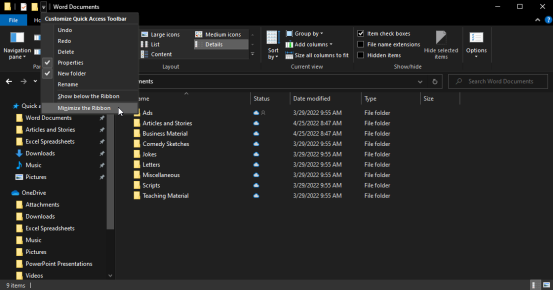
To change the size of your ribbon, click the Customize Quick Access Toolbar arrow located at the top of the File Explorer window. A menu with various commands will appear; one of these is 'minimize the Ribbon'. Selecting this option usually has a checkmark in front of it, and when selected, changes the size of your ribbon. If you want to maximize your ribbon so that it's always in view, deselect 'minimize the Ribbon' from the list instead.

File extensions are an essential way to reveal the file types displayed in File Explorer. However, you may not want or need to see the extension when you already know the file type based on its name or location. It's easy enough to turn on or off file extensions in Windows File Explorer: select the View tab at the top of the window and then you can see the File Extensions field on the right. To show extensions, checkmark File extensions. To make it disappear, uncheck it.
You can customize which panes are displayed to better suit your needs. On the left side of the window, you'll see the Navigation pane. This shows all the drives and folders on your PC. If you want to create more space for the other pane, you can turn it off. In Windows 10 File Explorer, turn off the Navigation pane by deselecting the checkmark next to it in the View tab of the ribbon. To re-enable the pane, click the icon and click the command back on again.
These are just some of the tips and tricks that you can use to make File Explorer more user-friendly. By using these tips, you can make sure that you are able to get the most out of this program. However, if you are still having trouble using File Explorer, you can always consult the Help section or contact Microsoft support.