Using a bread maker is a fantastic way to produce delicious homemade bread with minimal effort. Whether you’re a baking novice or an experienced cook looking to simplify the process, a bread maker can save time and ensure consistent results. If you’ve ever wondered how to use a bread maker effectively, this guide is for you. We’ll walk you through everything—from understanding its components to selecting the right settings. We’ll cover all the essential steps to ensure your baked goods are perfect every time. Ready to start baking? Let’s dive in!

Understanding Your Bread Maker
Before you begin, it’s essential to understand the key components and functions of your bread maker. Here’s what you need to know.
Components and Functions
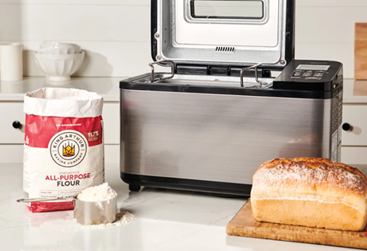
A typical bread maker consists of a bread pan, kneading blade, control panel, and lid. The bread pan holds the ingredients and the dough during the baking process. The kneading blade mixes and kneads the dough. The control panel allows you to select the baking program and monitor progress. Finally, the lid ensures an even baking temperature.
Bread Maker Settings Explained
Bread makers offer various settings for different types of bread and dough. Common settings include white bread, whole wheat, quick bread, French bread, and dough-only. Some machines also feature a delay timer, which allows you to set the machine in advance so you can have fresh bread ready at a specific time. Understanding these settings is crucial for achieving the best results.
What Are the Essential Steps to Use a Bread Maker?
Let’s explore the steps to using a bread maker effectively.
Gathering and Measuring Ingredients
Accurate measurement of ingredients is vital. Start by gathering flour, yeast, salt, sugar, and any other ingredients your recipe requires. Use kitchen scales and measuring cups for precision. Following the recipe exactly ensures the right balance, leading to perfect bread each time.
Loading Ingredients in the Correct Order
Adding ingredients in the correct order is crucial. Typically, liquids go in first, followed by dry ingredients, and finally, yeast. This order prevents the yeast from activating too early. Consult your bread maker’s manual for the recommended loading order.
Selecting the Appropriate Program
Choose the bread program that suits your recipe. For instance, select ‘whole wheat’ for whole grain bread. The control panel on your bread maker allows you to select the type and size of the loaf and the desired crust color.
Monitoring the Baking Process
While bread machines are largely hands-off, it’s a good idea to check the dough during the kneading phase. Ensure the dough isn’t too sticky or too dry. After this, the machine will handle the rest, from rising to baking.

How Does a Bread Maker Work and How to Use It?
To use a bread maker effectively, it helps to understand how it works.
The Bread Making Cycle Explained
A bread maker’s cycle includes mixing, kneading, rising, and baking. First, the machine mixes the ingredients. Then, it kneads the dough until it’s smooth. Next, the dough rises within the warm environment of the bread maker. Finally, the machine bakes the dough to perfection.
Tips for Optimal Performance
For the best results, use fresh ingredients, especially when it comes to yeast. Ensure the bread pan and kneading blade are correctly attached. Regularly clean your bread maker to maintain its performance. If your bread doesn’t rise properly, try adjusting the liquid amounts or checking the freshness of your yeast.
Conclusion
Using a bread maker simplifies the baking process, offering an easy path to delicious homemade bread. If you’ve ever wondered how to use a bread maker, this guide walks you through every step—from gathering the correct ingredients to selecting the right settings. By following the steps outlined, you’ll be able to efficiently use your bread maker and enjoy consistent results. With a bit of practice, you’ll become adept at making various types of bread perfectly tailored to your preferences. Enjoy the delightful experience of baking your own bread with ease!
FAQ
Can I use regular flour in my bread maker?
Yes, you can use regular flour, but bread flour typically yields better results due to its higher gluten content, which helps with rising and texture. If you use regular flour, consider adding vital wheat gluten to improve the bread’s structure.
How do I prevent my bread from sticking to the pan?
Prevent sticking by greasing the bread pan lightly with oil or using non-stick spray before adding ingredients. Ensuring the kneading blade is correctly positioned also helps with easy removal.
Why is my bread dense or not rising properly?
Dense bread can result from incorrect yeast amounts, outdated yeast, or insufficient kneading. Ensure your yeast is fresh and your measurements are accurate. If the problem persists, try adjusting the liquid in the recipe or the bread maker settings.